What are Thunderbird profiles and how to use them
How-ToThunderbird is one of the most popular email managers on the market. This is not only because it is a free program, but also thanks to the significant number of functionalities that it incorporates, and the plugins that can be added making this email manager perfectly adaptable to all types of users, whether they are companies or home users.
It is common for a user to have several email accounts, and want to check them all with the same email manager. With Thunderbird you can manage multiple mail accounts, you only need to add a new mail account using the option: " File->New-> Existing mail account ". This way when we open the mail manager we'll have all our mail accounts available in the same interface.
This configuration is sufficient for many of the use cases, however, there are times when it is convenient to separate some of our mail accounts from others. For example, it is possible that at home we want to check our personal email accounts, and also, the email accounts associated with work. In these cases, it is better to use the Profiles function (relatively unknown but very useful), included in Thunderbird.
Each Profile created in Thunderbird is a totally independent entity from the rest of the profiles. That is when we create a Profile, all the email accounts, configurations and plugins added to that Profile, will be exclusive to that Profile. For example, if we install a dictionary in Profile A, this dictionary will not be available in Profile B. Profiles achieve the same effect that we would have if we used Thunderbird on two different computers, i.e. two completely different entities. It is a way to isolate and separate our working environments on the same PC.
Let's illustrate the concept of Profile with a practical example. Let's imagine that we make use of the following email accounts: myemail@hotmail.com, myemail@gmail.com, myemail@yahoo.es, workemail@acerosgrandotes.com, workemail@petroliferatorrenteseco.com. We want to separate them so that when we open Thunderbird, we only see the personal accounts or the work accounts, but never both mixed. What we are going to achieve by creating Profiles is the separation of those accounts. So that they will be organized as follows:
Personal:
myemail@hotmail.com
myemail@gmail.com
myemail@yahoo.es
Work:
workemail@acerosgrandotes.com
workemail@petroliferatorrenteseco.com
When we open the mail manager, we can choose which profile to load. This way, if we're in the Work profile, we'll only see the 2 work accounts, and if we access the Personal profile, we'll see the 3 personal mail accounts.
New profiles can't be created from the Thunderbird interface so we need to launch the program from the command line by adding a specific argument:
In Windows we must go to "Start->Run", and type thunderbird.exe -ProfileManager and press Enter.
In Mac OS X we must access the Terminal, and type in: /Applications/Thunderbird.app/Contents/MacOS/thunderbird-bin -ProfileManager and press Enter.
In Linux, we must access the Terminal and type in: Thunderbird -ProfileManager and press Enter.
After executing the command, the profile creation and editing screen will appear.
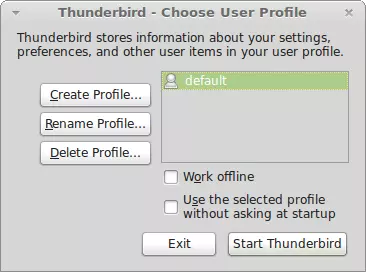
As we can see, there is already a Profile created (default). This means that Thunderbird uses a default profile transparently, without the need to configure anything. The default profile is the one we have been using with our current configuration. In our case, we are going to rename it to Personal. To do this, in the profile manager we select the default profile and click on the Rename Profile button. Enter the new name and click on OK.
Now let's create the Profile for the work email accounts by clicking on the Create Profile button. The Create Profile wizard appears. An explanatory screen about the Profiles is displayed, click on the Next button. 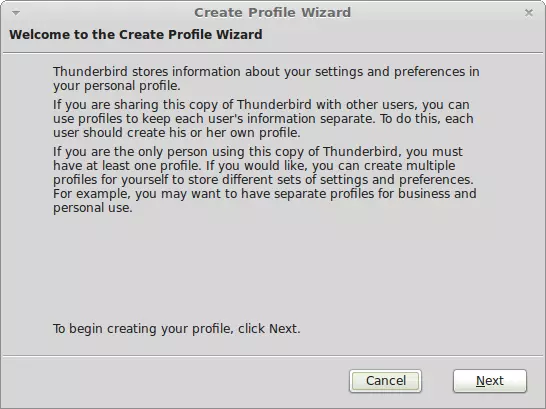
In the next screen we must enter the name of the new Profile, in our case Work. We can choose the directory where the files of the Profile will be stored, it is convenient to leave the directory that appears by default. 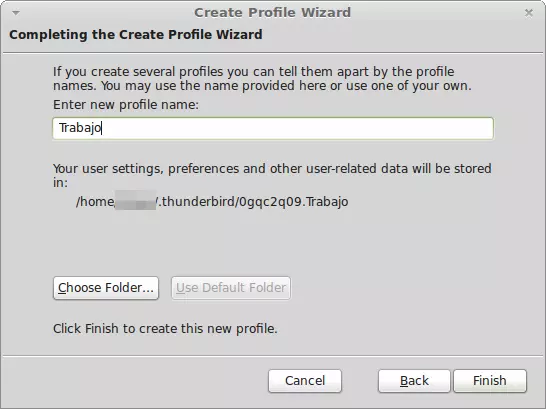
We press the button Finish, and we will see that in the Profile selection screen there are now 2 profiles. 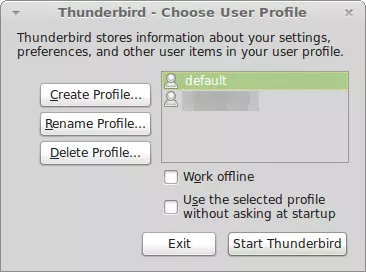
To access any of the profiles, we just double-click on the name or select a profile and press Start Thunderbird.
We already have two independent profiles, and we can see that each profile has its associated email accounts (the new profile will have none). Now we must add the mail accounts, install the necessary plugins and adjust the settings of the new profile.
In the Profile selection screen, we can select the "Use the selected profile without asking at startup" checkbox. What this box does is it starts Thunderbird by default loading the Profile we select in the Profile selection screen. For example, if we select the Profile from Work and check the box for Do not ask at startup, every time we start Thunderbird, the Profile from Work will be loaded. If we want to select the Personnel Profile, we must launch the program again from the Terminal and add the additional argument (thunderbird.exe -ProfileManager).
The easiest way is not to check the option "Do not ask at startup", and this way, every time we start Thunderbird, the Profile selection box will appear.
As we can see, the option to create Profiles in Thunderbird is something very useful and practical, either to separate personal accounts or to allow the use of this mail manager to several users without mixing mail accounts or configurations.